When Lois and I are cycling together, there is always a small issue that bothers us. As a rule, it is not safe to ride side by side. Then, as a less experienced and active cyclist, she usually can’t keep up with my speed. That means during our rides together, I am always taking the lead and have to glance back to check on her status from time to time, to make sure she has not fallen too far behind. After a long climb, I also can’t fully enjoy my much-deserved speedy descend in fear that she, who has a natural aversion for speed, will fail to catch up, miss a turn, etc.
We have tried out the location-sharing features offered by Google Maps, WhatsApp and some other Apps, but yet to find one that suits our needs. That’s when we learned about Velodash, a cycling App specifically designed for group cycling. In addition to the usual route drawing and event planning functions offered by most other cycling/tracking Apps, it also boasts of a real-time location sharing feature that “allows you to see the current location of your friends” – exactly what I need when I go cycling with Lois.
It took us some time to locate this function after installing the App – which is a bit frustrating at first. Turned out this feature is only available for cyclists who have joined the same event created in the App. But once we got this figured out, we love it immediately. I can check on Lois’ location and status anytime just by glancing at the same navigation screen. After the climb, I can leave her behind for a moment and enjoy my speedy descend. She will know where I am heading, follow my trail easily, and know where to meet me when I have stopped to wait for her. Our rides together become so much smoother and more enjoyable, thanks to Velodash.
It seems there is not much information about this wonderful feature of Velodash out there. I am more than happy to share a step-to-step guide here.
How to share real-time location on Velodash when cycling
1. Install your Velodash App and create your account/profile
2. Search for your friend’s profile and follow each other
3. Go to the tab of Discover on the left bottom corner
4. Tap on the “+” sign at the top right corner to create an “Event”

Step 1 & 2: Set up your profile and find your friends on Velodash Step 3 & 4: Create an event on Velodash


5. At the page bottom, select “Plan an Event”
6. On the page of “Edit Event”, fill in info like “Title”, “Start time”, and “Stops”
7. Turn off “Open for search” if this is meant to be a private event
Step 5: Select “Plan an Event” 
Step 6 & 7: Edit event details


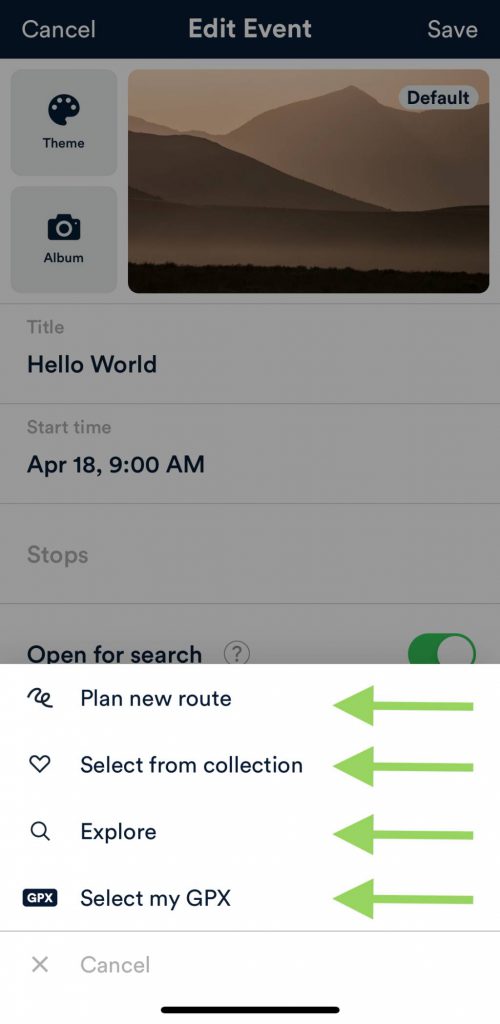
8. “Stops”: This is how you plan a route for the event. There are four ways to do it: plan a new route on the fly; select from the routes you have saved; search for routes created by other Velodash users; and upload a GPX file
Step 8: Plan a route for your event
9. Save the “Event” page when you are done
10. On the “Event” page, add your friends to the “Participants”
11. Hit “Start” on the “Event” page
12. Voilà! All the participants will see each other’s status on the map after hitting “Start”. As you can see here, the Blue Dot is me, with Lois being right in front of me on Paused, waiting for me. The solid red line is what I have covered. The dotted route in black is the route planned and yet to travel

Step 9 – 11: Add your friends as participants and hit “Start” 
Step 12: Real-time location sharing on Velodash


About the route planning function of Velodash
The built-in route planning function is simple and intuitive. You can just specify multiple stops on the map and the App will do the routing for you. However, with the aim to come up with the shortest path, in most cases, the route suggested is not the most ideal one for cycling. The dedicated bikeways are usually ignored. So, if you want to go by a very specific route, it’s better to plot it on a desktop with Strava or Xplova, and then export and upload the GPX file to Velodash.
However, we don’t always have access to our desktops and sometimes we just want to do a spontaneously ride. As mentioned earlier, in order to use the real-time location sharing feature, we must join a Velodash event. That means we have to have a route after all. In this case, I would just give the route planner the starting stop and end stop, and use the route it suggested for the event planner. You don’t really need to follow this suggested route. You are free to deviate from it while still seeing each other’s location and status.
Other Impressive Features of Velodash
There are lots of popular routes created and shared by fellow cyclists; they can be found in the Discover – Explore tab. You can save the ones you’re interested in to your own collection, and retrieve them when you are planning your event.
We can also explore other fellow cyclists’ events and join them if you are interested. I once created an event for testing and received a message from some guy asking if he could join me. Too bad I had to turn him down.
Velodash can also be connected to external sensors to improve accuracy. I have successfully connected a Garmin speed sensor to the App.